Al-Malik - The King and Owner of Dominion.
Learning the ninety-nine names of Allah should not be just about memorising a long list of names. It should be something that helps children to understand their Lord and form a relationship with Him. It should be more than just words on the tongue, but should touch their hearts and deepen their love for God.
One way of engaing young kids in Islamic education is through arts and crafts
This week in our Muslim homeschool we learnt the name:
Al-Malik - The King and Owner of Dominion.
We began by talking about the definition:
'Al-Malik is both the Owner, who possesses, and the King, who has complete authority and commands what He possesses. The One to whom the commanding and forbidding belong to. The King, The Sovereign Lord, The One with the complete Dominion.'
Whilst the kids were making the Crown Craft (outlined below) our conversation went something like this:
"Allah is The King. He is The King of kings. He is your King!
But what is a King? What does a King do?"
After a bit ( NO.... a lot!) of prompting they arrived at the answer,
"A king owns everything, tells everyone what to do and punishes those who disobey him."
"But who owns the King? Who tells him what to do? Who punishes the King if he is naughty?"
"ALLAH!"
"Allah is the King of Kings! Al-Malik!"
It is important for your children to understand that He is not like anything they can imagine. He is not like any King they know, and He most certainly does NOT have a crown!
 Children's Crown Craft
Materials Needed
- Gold card
- Tissue paper
- Fun fur (1-2"wide)
- Stickers
- PVA glue
- Stapler
- Selo-tape
- From the gold card, cut out two strips, each approximately 2" wide.
- Staple two card strips together. This will be the base of your crown.
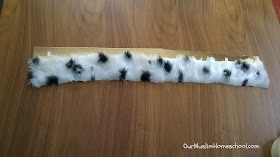
- Spread PVA glue along the bottom half of each card strip and stick the fun fur along this edge. It will look best if you allow some of the gold card to show at the top.


- Meanwhile cut out 4 more gold strips from the card, each 1" wide.
- Staple 2 strips together, with the gold side facing inward.
- Once the glue has dried on the fur, staple the wider card strip together, making sure that it is the correct size for your child's head.
- Attach this across the top of the crown base.
- Repeat from step 5 with the remaining strips and staple perpendicular to the first arch.
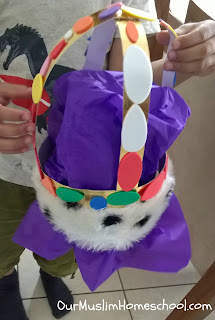
- Decorate the crown with stickers and jewels.
- When everything has dried, push the tissue paper up into the underside of the crown and use your selo-tape to secure it in place.

To make sure you don’t miss the next blog post, Subscribe to my mailing list.
For a daily look into our homeschooling day follow me on Instagram, Twitter or Facebook.
Thank you so much for stopping by our blog!
Please remember us in your duaas.
Peace and Love.


No comments:
Post a Comment